Hydraulic puller combination sets are indispensable for professionals and DIY enthusiasts when removing stubborn gears, bearings, pulleys, and other press-fitted components. These versatile tools can make seemingly impossible tasks manageable, but mastering their use requires a clear understanding of their operation and safety precautions.
Understanding the Components
Before diving into using a hydraulic puller combination set, it’s crucial to familiarize yourself with its components. This set typically includes a hydraulic cylinder, various puller jaws, extension rods, and a hand pump. Understanding each component’s function is crucial since it affects how the puller works differently.
Selecting the Right Puller Jaws
The first step in using a hydraulic puller combination set like the TMHC 110E is selecting the appropriate puller jaws. Puller jaws come in different shapes and sizes to accommodate various components. Ensure that the jaws you choose match the shape and size of the part you need to remove. Using the wrong jaws can damage the component or pose a safety hazard.
Securing the Workpiece
Once you have chosen the correct puller jaws, it’s time to secure the workpiece. Ensure the component you remove is stable and properly supported to prevent accidents or damage. Use blocks or other support structures to keep the workpiece in place if necessary.
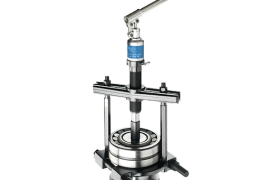
Assembling the Hydraulic Puller
Assemble the hydraulic puller, such as the Strong Back Puller, by attaching the selected puller jaws to the hydraulic cylinder. Ensure they are securely fastened to prevent unexpected dislodging during the pulling process. Double-check all connections to guarantee they are tightened correctly.
Positioning the Hydraulic Puller
Proper positioning of the hydraulic puller is crucial for a successful operation. Align the puller jaws with the workpiece, ensuring they are centered and in contact with the component’s surface. A misaligned puller can exert uneven force and potentially damage the part.
Applying Hydraulic Pressure
With the hydraulic puller in position, it’s time to apply hydraulic pressure to create the necessary force for removal. Connect the hand pump to the hydraulic cylinder and start pumping. As you pump, you will notice the pressure gauge indicating the amount of force being applied. Be cautious to stay within the recommended pressure limits specified in the manufacturer’s instructions.
Monitoring the Pulling Process
As the hydraulic pressure builds up using the Hydraulic Puller Kit, the component slowly separates from its housing. Pay close attention to the pulling process and monitor the progress carefully. If you notice any unusual sounds or resistance, stop immediately and reassess the situation to avoid potential damage or injury.
Releasing Pressure and Removing the Component
Once the component has been pulled from its housing, release the hydraulic pressure by loosening the hand pump. This step is critical for safe removal and to avoid sudden ejection of the part. Carefully detach the puller jaws from the component and remove it from the work area.
Efficient Component Removal
Mastering a hydraulic puller combination set is a valuable skill for anyone working with press-fitted components. Following the steps outlined in this guide and adhering to safety precautions, you can efficiently and safely remove even the most stubborn parts, making your repair and maintenance tasks more manageable and successful.